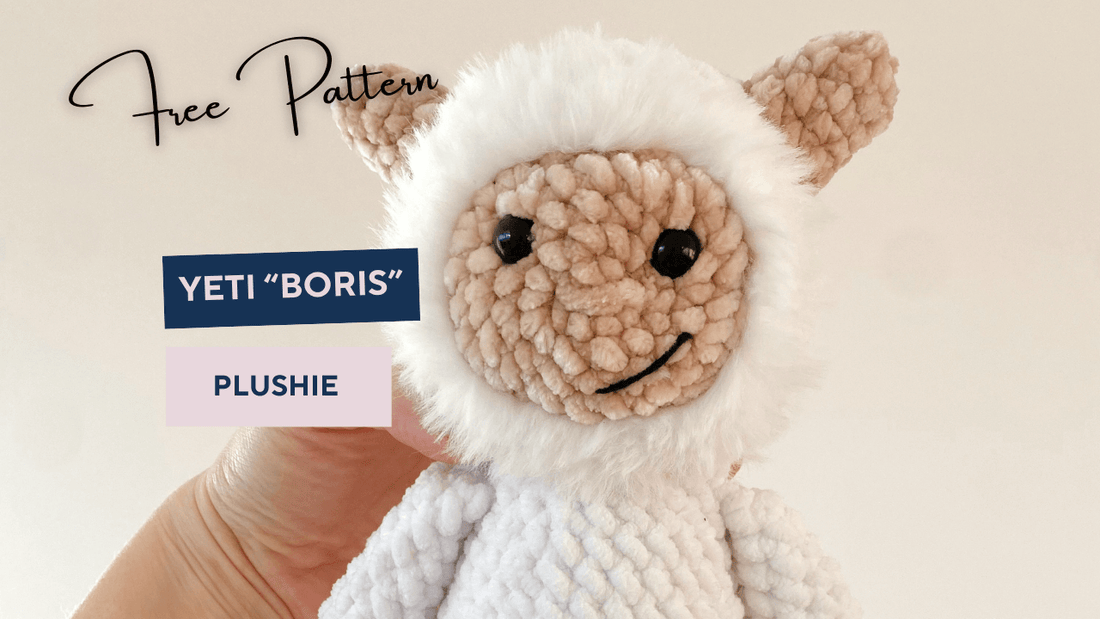
"Boris" Yeti Plushie
🌨️❄️ Meet Boris, the Adorable Yeti – Your Perfect Winter Crochet Project! 🧶🦶
Crochet your very own plush toy snow monster with our Boris the Yeti crochet pattern. Designed for both beginners and seasoned crocheters, this pattern allows you to bring the legend of Bigfoot to life with a plush toy twist!
Made with chenille yarn, Boris is not just a monster amigurumi; he's a winter-themed delight that adds a touch of whimsy to any space. Whether you're a fan of legendary creatures or seeking a unique plush companion, Boris is here to make your winter crafting cozy and charming. 🌨️👣
Craft your very own winter wonder with Boris the Yeti – a playful addition to your plush toy collection. Click "Add to Cart" now and embark on a crochet journey that brings the magic of winter right into your hands! ❄️🧶
What you need
Yarn
Chenille yarn (blanket yarn) | yarn weight: 5 bulky or 6 super bulky.
- Main color: White, Cream, Natural White, Oatmilk, Brown, Grey (approx. 120 m ; 125 yards)
- Foot, Hand and Face: Nude, Peach, Cream, Pale Pink, Salmon (approx. 50 m ; 165 yards)
- Embroidered nose: Nude, Peach, Cream, Pale Pink, Salmon (approx. 0.2 m ; 0.3 yards)
Fur yarn | yarn weight: 5 bulky or 6 super bulky
- Colors: White (approx. 2 m ; 3 yards)
8/4 cotton yarn | yarn size 2.5mm - 3.5mm.
- Embroidered eyes: Black (approx. 0.2 m ; 0.3 yards)
Accessories
- Crochet hook:
- Polyester toy stuffing*
- Stitch marker*
- Security eyes* of your choice. I used 10 mm
- Tapestry needle*
- Scissors*
- Long pins*
- Optional: Animal hair brush*
* Affiliate Link goes to Amazon US
Note: If you'd like to support my work in creating more free patterns, and you're in need of new crochet supplies, consider shopping through my affiliate links. Every purchase helps me keep designing and sharing with you! 💕
Before you start
Finish size
Depending on your yarn, crochet hook and tension.
- approx. 30 cm | 12'' with crochet hook 4 mm and 5 bulky yarn
- approx. 50 cm | 21'' with crochet hook 7 mm and 6 super bulky yarn
Abbreviations
sc: single crochet stitch | inc: increase | dec: decrease | sl st: slip stitch | ch: chain | mr: magic ring | hdc: half double crochet | FLO: front loop only | BLO: back loop only | dc4tog: Bobble stitch with 4 double crochet stitches
Level of difficulty
Intermediate. Feel comfortable: crocheting multiple pieces, crocheting with chenille yarn, do not mind sewing parts together, know the following stitches or willing to learn.
Legal notice
© 2024 Juliane Heise. All rights reserved.
This crochet pattern is not allowed to be sold, resent, reproduced, published, translated into other languages, shared with other crochet patterns or modified and resold as your own tutorial. Crocheting from the photo is allowed. However, it is not allowed to sell the resulting pattern.
The sale of the self-crocheted item is allowed in small quantities if it is accompanied by a reference to the designer: "This item was handmade by ...(your name).... from designs, tutorial, and/or pattterns by Spreeberry Creative - Juliane Heise." Also, the manufacturer/creator is responsible for meeting the necessary local safety standards (CE marking in EU, The Standard Consumer Safety Specification for Toy Safety in the USA etc.). The Pattern Designer does not assume any liability.
Pattern Instruction
Arms
Make 2. Stuff the arms.
Start with Skin color
R1: 6 sc in mr [6]
R2: 6 inc [12]
R3: (1 sc, 1 dc4tog) x3, 6 sc [12]
R4-6: 12 sc [12] 3 rounds
Change to Main color. Invisible color change.
R7-10: 12 sc [12] 4 rounds
Start stuffing the arm.
R11: 10 sc, 1 dec [11]
R12-14: 11 sc [11] 3 rounds
R15: 9 sc, 1 dec [10]
R16-17: 10 sc [10] 2 rounds
R18: 8 sc, 1 dec [9]
R19: 9 sc [9]
R20: 7 sc, 1 dec [8]
Ensure the fingers face forward. Depending on your tension, they may not align perfectly. If necessary, add extra single crochets for a proper fit.
Fold arm and crochet the two opposite stitches together with 4 sl st. Cut the yarn and secure.
Legs
Make 2. Stuff the legs.
Start with Skin color
R1: 6 sc in mr [6]
R2: 6 inc [12]
R3: (1 sc, 1 inc) x6 [18]
R4: 18 BLO sc [18]
R5: 7 sc, (1 dc4tog, 1 sc) x3, 5 sc [18]
R6: 7 sc, 1 dec, 1 sc, 1 dec, 6 sc [16]
R7: (6 sc, 1 dec) x2 [14]
R8: 6 sc, 2 dec, 4 sc [12]
Change to Main color. Invisible color change.
R9: (3 sc, 1 inc) x3 [15]
Start stuffing the leg.
Right leg:
R10-12: 15 sc [15] 3 rounds
Cut the yarn and fasten off. Leave a bit of yarn to sew the spaces (if there are any) after joining the legs.
Left leg:
R10-11: 15 sc [15] 2 rounds
R12: 14 sc (we do not crochet the last stitch of that round.)
Connection the legs:
Crochet 2 ch.
Hold the leg on the left next to the second leg on the right. Join chain and right leg with a sc. Thus both legs are connected to each other.
Mark this connecting stitch with a stitch marker. This is now the first stitch of a new round.
Continue with Main color
R13: 14 sc in right leg (we have already crocheted the link stitch and it counts as the 1st of the total 15 sc in the right leg), 2 sc in chain, 15 sc in left leg, 2 sc in chain [32]
Body
R14: (16 sc, 1 inc) x2 [36]
R15: (5 sc, 1 inc) x6 [42]
R16-20: 42 sc [42] 5 rounds
R21: (12 sc, 1 dec) x3 [39]
R22: 39 sc [39]
R23: (11 sc, 1 dec) x3 [36]
R24: 36 sc [36]
R25: (10 sc, 1 dec) x3 [33]
R26: 33 sc [33]
R27: (9 sc, 1 dec) x3 [30]
R28: 30 sc [30]
Start stuffing the body.
R29: (8 sc, 1 dec) x3 [27]
R30: 27 sc [27]
R31: (7 sc, 1 dec) x3 [24]
R32: 24 sc [24]
R33: (6 sc, 1 dec) x3 [21]
R34: (5 sc, 1 dec) x3 [18]
Do not cut the yarn. Continue crocheting the neck and head.
Neck & Connectiong arm and body
Option 1: No sewing
This is the preferred option for everyone who does not like sewing body parts. But be aware, that a small optical offset between left and right arm may occur here, since we are working in (spiral) rounds.
Fold the arms so that the fingers are facing front.
R35: 1 sc with left arm (the 3 remaining sc we will crocheting at the end of this round), 6 sc, 4 sc with right arm, 4 sc, 3 sc with left arm [18]
Option 2: Sewing
This is the preferred option for everyone who does not mind sewing and also do not want a small optical offset between left and right arm, since we are working in (spiral) rounds.
R35: 18 sc [18]
We do not sew the arms yet but crochet the head first.
Head
Continue with Main color
R36: (1 sc, 1 inc, 1 sc) x6 [24]
R37: (3 sc, 1 inc) x6 [30]
R38: (2 sc, 1 inc, 1 sc) x6 [36]
R39-46: 36 sc [42] 8 rounds
R47: (2 sc, 1 dec, 2 sc) x6 [30]
Start stuffing the head.
R48: (3 sc, 1 dec) x6 [24]
R49: (1 sc, 1 dec, 1 sc) x6 [18]
R50: (1 sc, 1 dec) x6 [12]
R51: 6 dec [6]
Fasten off and close the hole.
When using the sewing arm to body option: Attach them on R35.
Horns
Make 2. Stuff the horns if you want.
Skin color
R1: 6 sc in mr [6]
R2: 6 sc [6]
R3: (1 inc, 2 sc) x2 [8]
R4: 8 sc [8]
R5: (1 inc, 3 sc) x2 [10]
Finish with a sl st. Cut the yarn with enough left over for sewing to the head.
Sew horns on head between R45 and 57. The horns go over 3 rounds.
Face
Skin color
R1: 5 ch, in 2nd. loop from hook: 1 inc, 2 sc, 4 sc in 1 st, 2 sc, 1 inc [12]
R2: 2 inc, 2 sc, 4 inc, 2 sc, 2 inc [20]
R3: 2 sc, (1 inc, 5 sc, 1 inc, 2 sc) x2 [24]
R4: 3 sc, 1 inc, 6 sc, 1 inc, 4 sc, 1 inc, 6 sc, 1 inc, 1 sc [28]
R5: 4 sc, 1 inc, 7 sc, 1 inc, 5 sc, 1 inc, 7 sc, 1 inc, 1 sc [32]
To finish the face, crochet 1 additional sl st. Cut the yarn with enough left over for sewing on head.
Position the security eyes between row 3 and 4 with 6 stitches apart.
Sew the face to the head between R27 and 34, covering 8 rounds. Recommendation: For a cleaner look and/or if you do not do the fury yarn, attach only through the back loop and the face.
Face Fur Trim
Take the faux yarn.
Make a loop and single crochet into one stitch of your choice (make sure you stitch in white yarn) and crochet around.
Fasten off and sew in yarn.
Finish. Have fun with Boris