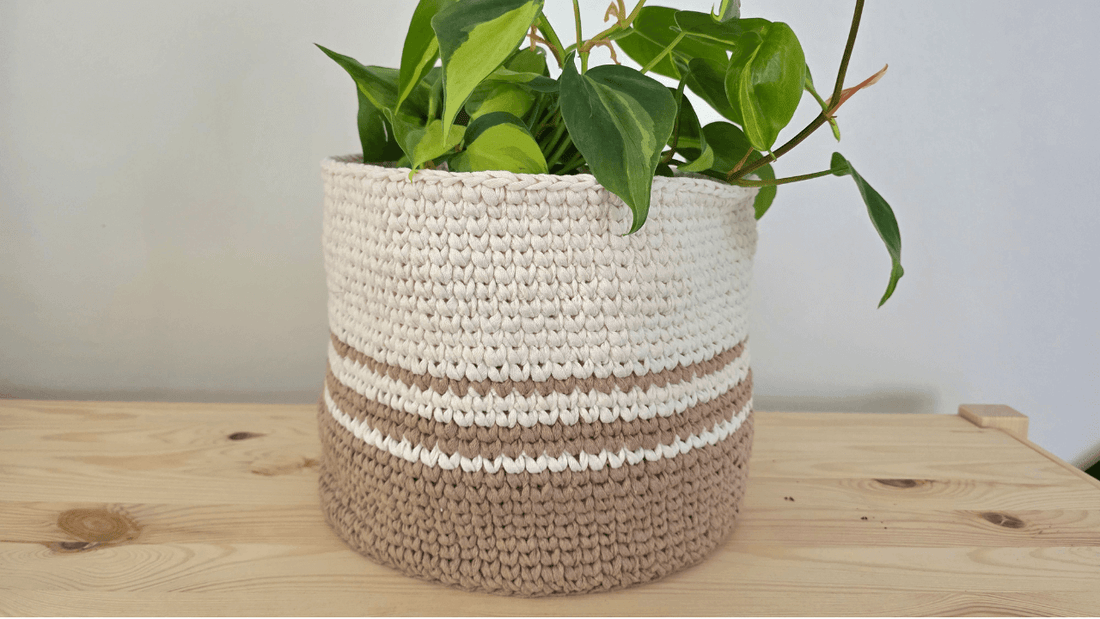
Basket "Fabienne"
Transform your living space with this beautiful free crochet basket pattern for the "Fabienne" home decor basket! This versatile crochet storage basket is perfect for organizing your home while adding a touch of handmade charm to any room.
Pattern Details & Sizing
The Fabienne basket stands at a practical 8 inches (20 cm) tall and comes in three convenient sizes to meet all your storage needs:
- Small: 6.7 inches (17 cm) diameter
- Medium: 7.9 inches (20 cm) diameter
- Large: 9.8 inches (25 cm) diameter
Whether you're looking for a beginner-friendly crochet project or searching for DIY home organization ideas, this sturdy basket pattern delivers both function and style. Perfect for storing yarn, toys, toiletries, or any household items that need a cozy home.
This free crochet home decor pattern includes detailed step-by-step instructions and is suitable for intermediate beginners who are comfortable with basic crochet stitches. Create a matching set in different sizes for a cohesive look throughout your home!
What you'll love about this pattern
- Free and easy to follow
- Three size options for versatility
- Sturdy construction for everyday use
- Beautiful texture that complements any decor style
- Great for gift-giving or personal use
Ready to get started? Grab your hook and let's create something beautiful for your home!
Needed Material
Yarn
Ribbon yarn; weight super bulky. Colors:
- Off White or Ecru: 1 skein
- Beige or Light Brown: 1 skein
.
Finished size:
- Mercerised Cotton, fingering weight, with 2 mm hook (approx. 5,5 cm ; 2 inch
- Chenille, super fine weight, with 3 mm hook(approx. 10 cm ; 4 inch)
- Chenille, bulky weight, with 4 mm hook(approx. 14 cm ; 5.5 inch)
Accessories
- Crochet hook* (depending on your yarn and own tension)
- Tapestry needle*
-
Scissors*
* Affiliate Link goes to Amazon US
Note: If you'd like to support my work in creating more free patterns, and you're in need of new crochet supplies, consider shopping through my affiliate links. Every purchase helps me keep designing and sharing with you! 💕
Written Instruction
Abbreviations
sc: single crochet stitch hdc: half double crochet stitch | wc: waistcoat stitch/knit stitch |
BLO: back loop only | inc: increase | sl st: slip stitch | ch: chain | mr: magic ring
Instruction
Beige/Light Brown
R1: 8 hdc in mr, join to the first stitch with a sl st, ch 1 [8]
R2: 8 hdc inc, join to the first stitch with a sl st, ch 1 [16]
R3: (1 hdc, 1 hdc inc) x8, join to the first stitch with a sl st, ch 1 [24]
R4: (1 hdc, 1 hdc inc, 1 hdc) x8, join to the first stitch with a sl st, ch 1 [32]
R5: (3 hdc, 1 hdc inc) x8, join to the first stitch with a sl st, ch 1 [40]
R6: (2 hdc, 1 hdc inc, 2 hdc) x8, join to the first stitch with a sl st, ch 1 [48]
For Size S end here and go to next page
R7: (5 hdc, 1 hdc inc) x8, join to the first stitch with a sl st, ch 1 [ [56]
R8: (3 hdc, 1 hdc inc, 3 hdc) x8, join to the first stitch with a sl st, ch 1 [ [64]
For Size M end here and go to next page
R9: (7 hdc, 1 hdc inc) x8, join to the first stitch with a sl st, ch 1 [ [72]
R10: (4 hdc, 1 hdc inc, 4 hdc) x8, join to the first stitch with a sl st, ch 1 [ [80]
For Size L end here and go to next page
NOTE: Previously, we chained 1 at the end of the round (bottom part). Now, with doing color changes, we chain 1 at the beginning of the round to create a seamless, none-offset look.
Continue with Beige/ Light Brown
R1: 80 BLO sc, join to the first stitch with a sl st [ [80]
R2-8: (7 rounds) ch 1, 80 wc, join to the first stitch with a sl st [80]
Change to Off White/Ecru
R9: ch 1, 80 wc, join to the first stitch with a sl st [ [80]
Change to Beige/Light Brown
R10: ch 1, 80 wc, join to the first stitch with a sl st [80]
R11: ch 1, 80 wc, join to the first stitch with a sl st [80]
Change to Off White/Ecru
R12-13: (2 rounds) ch 1, 80 wc, join to the first stitch with a sl st [80]
Change to Beige/Light Brown
R14: ch 1, 80 wc, join to the first stitch with a sl st [80]
Change to Off White/Ecru
R15-26: (12 rounds) ch 1, 80 wc, join to the first stitch with a sl st [80]
Cut yarn and weave in ends.